In the part 1 post, we covered the issue and technical requirements for Cisco Mobility Express (CME) with FreeRADIUS dynamic VLANs. using a Cisco Aironet 1852i (AIR-AP1852I-Z-K9). The issue was that the RADIUS attribute-value pairs for dynamic VLANs were not passed on the second stage authentication handshake.
Don’t forget that this post is part of a longer series. Below are the series of articles:
Part 1 – Understanding the issue with CME and FreeRADIUS.
Part 2 – Configuring FreeRADIUS (this post).
Part 3 – Configuring Cisco Mobility Express.
Part 4 – Migrating to a FreeRADIUS Web GUI (DaloRadius) for easier management.
Installing FreeRADIUS
To install FreeRADIUS on Ubuntu using the following command. This installs the base service, utilities, common libraries and default configuration.
$ sudo apt install freeradius-common freeradius-config freeradius-utils freeradius libfreeradius3If the installation has been successful there should be a directory in /etc/freeradius/3.0 with the following files and folders:
user@server:/etc/freeradius/3.0$ ls
certs
clients.conf
dictionary
experimental.conf
hints -> mods-config/preprocess/hints
huntgroups -> mods-config/preprocess/huntgroups
mods-available
mods-config
mods-enabled
panic.gdb
policy.d
proxy.conf
radiusd.conf
README.rst
sites-available
sites-enabled
templates.conf
trigger.conf
users -> mods-config/files/authorize
Fresh Installation or Reinstalling
Sometimes your FreeRADIUS configuration could be completely messed up and it is easier to start again. To completely remove and purge your FreeRADIUS configuration, run the following commands:
$ sudo apt purge freeradius-common freeradius-config freeradius-utils freeradius libfreeradius3After running this command, check that the directory /etc/freeradius/3.0 has been removed. If not remove the folder manually:
sudo rm -rf /etc/freeradius/3.0Basic FreeRADIUS configuration
To get our FreeRADIUS service running, we need to configure the Network Access Servers (NAS) and the required RADIUS users. The NAS is the network infrastructure device that is proxing a user request from the Wi-Fi or fixed network. In our case, this is the Cisco Mobility Express (CME) IP address.
NAS Configuration
Edit the clients.conf file in the root of your FreeRADIUS folder (typically /etc/freeradius/3.0) and add the following replacing IP Address of your controller and secret with your options. I use nano to edit files – also remember to use sudo (the full command is sudo nano clients.conf)
#######################################################################
#
#  Define RADIUS clients (usually a NAS, Access Point, etc.).

#
#  Defines a RADIUS client.
#

client wap-controller {
  ipaddr = <IP address of CME>
  nas_type = cisco
  secret = <your preferred secret password>
  require_message_authenticator = no
  limit {
        max_connections = 16
        lifetime = 0
        idle_timeout = 30
  }
}
It is also worth adding an entry for your PC or laptop for testing as we will use that later.
client radius-test {
  ipaddr = <IP address of your PC>
  secret = <temporary secret password - different to above>
}
User Configuration
We also need to configure some users in the users file (note no extension to this file). The user configuration contains the attribute value pairs required for dynamic VLANs. Below is an example for two users – substitute the usernames, passwords and VLAN ID/number for your required users. At this stage, usernames are case sensitive but we will fix that later.
#
#       Configuration file for the rlm_files module.
#       Please see rlm_files(5) manpage for more information.
#
#       This file contains authentication security and configuration
#       information for each user.

harry  Cleartext-Password := "Potter"
       Service-Type = Framed-User,
       Tunnel-Type = VLAN,
       Tunnel-Medium-Type = IEEE-802,
       Tunnel-Private-Group-Id = <VLAN number for Harry, eg. 9.75>

ron  Cleartext-Password := "Weasley"
     Service-Type = Framed-User,
     Tunnel-Type = VLAN,
     Tunnel-Medium-Type = IEEE-802,
     Tunnel-Private-Group-Id = <VLAN number for Ron, eg. 13>
Case Insensitive Users
The default configuration of FreeRADIUS checks the username common issues such as “..” in the username and incorrectly formatted domains (e.g., trailing dots).
We can modify the authorisation rules that controls this to reformat the usernames to lowercase to allow users to capitalise their usernames, use uppercase or use mixed usernames.
The authentication is parsed through the outer and inner tunnel so we will need to edit two files in the same way to ensure consistency of the username – this is highlighted in the configuration file. This is the full command with sudo and nano to edit the first and second file (default and inner-tunnel).
$ sudo nano /etc/freeradius/3.0/sites-enabled/default
$ sudo nano /etc/freeradius/3.0/sites-enabled/inner-tunnel
Once the editor is open. Add the following section in bold directly under the authorize function and before the filter_username instruction so that your file looks like the below. I like to add a comment on when I added the change in case I look at the file some time later.
#  Authorization. First preprocess (hints and huntgroups files),
#  then realms, and finally look in the "users" file.
#
#  The order of the realm modules will determine the order that
#  we try to find a matching realm.
#
#  Make *sure* that 'preprocess' comes before any realm if you
#  need to setup hints for the remote radius server
authorize {
        # Convert username to lowercase
        # Added by <user> on <date>
        update request {
                Stripped-User-Name := "%{tolower:%{User-Name}}"
        }
Changing the order of the files – key article:
FreeRadius is not sending attributes to the Wirele… – Extreme Networks – 34399
Some clients such as Windows 11 and later MacOS versions may have issues with the ciphers used in the eap module. We can force FreeRadius to be backwards compatible with TLS 1.0 to TLS 1.2.
$ sudo nano /etc/freeradius/3.0/mods-enabled/eapOnce the editor is open, add the following modification to the configuration with the cipher line as below:
#  Set this option to specify the allowed
#  TLS cipher suites.  The format is listed
#  in "man 1 ciphers".
#
cipher_list = "DEFAULT@SECLEVEL=1"
If this configuration causes issues with clients, try “DEFAULT@SECLEVEL=0”.
Starting FreeRADIUS in debug mode
Once you’ve made all the modifications to your FreeRADIUS configuration, FreeRADIUS should be started in debug mode to check the configuration. If the FREERadius service has been started, it needs to be stopped before running FREERadius in debug mode. The important message is the status Stopped in the last part of the status message.
To stop and check the status of the FreeRADIUS service, run the following commands. To ensure that FreeRADIUS has stopped, look for the ‘Stopped ‘ message.
$ sudo systemctl stop freeradius

$ sudo systemctl status freeradius

 freeradius.service - FreeRADIUS multi-protocol policy server
    Loaded: loaded (/lib/systemd/system/freeradius.service; enabled; preset: enabled)
    Active: inactive (dead) since Wed 2024-02-28 09:39:16 ACDT; 6s ago
  Duration: 4.210s
<snip - detailed information>
Feb 28 09:39:16 radius systemd[1]: Stopped freeradius.service
To run FREERadius in debug mode, use the following command and check the output – remember to use sudo unless you are running as root user. If the final output of the command is Ready to process requests, then your configuration is good. If not, examine the debug output and check your configuration files.
$ sudo freeradius -X

FreeRADIUS Version 3.2.3
Copyright (C) 1999-2022 The FreeRADIUS server project and contributors
There is NO warranty; not even for MERCHANTABILITY or FITNESS FOR A
PARTICULAR PURPOSE
You may redistribute copies of FreeRADIUS under the terms of the
GNU General Public License
For more information about these matters, see the file named COPYRIGHT
Starting - reading configuration files ...
<snip - lots of debug messages>
Ready to process requests
Testing Your Configuration
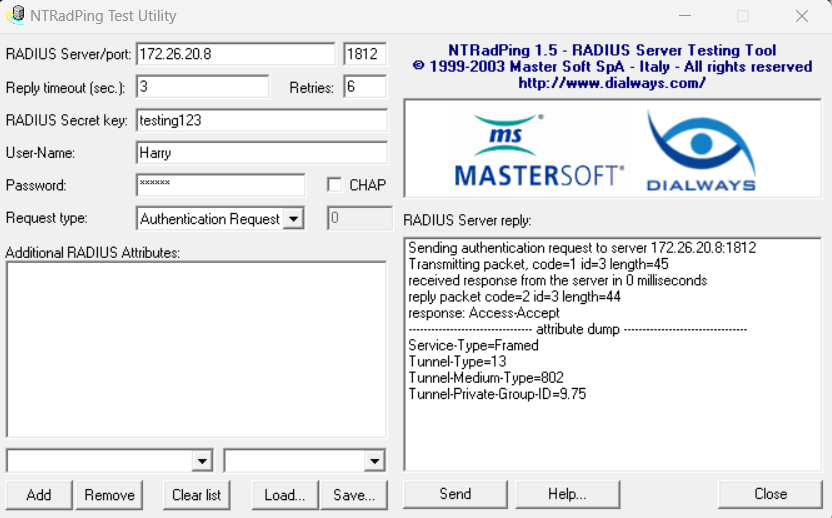
There are two ways to test your configuration – you can do this directly on the Ubuntu host using radtest and also use an awesome application called NTRadPing.
NTRadPing is a freeware Windows utility for testing RADIUS authentications. It acts as a RADIUS client and the attribute-value pairs can be checked. Download NTRadPing and extract it to a folder than you intend to use it from.
It is worth checking FreeRADIUS is working locally on the Ubuntu server. To do this run the following command substituting your username and password that you configured in the user file. Your will need to run FreeRADIUS in debug mode in a separate shell session. The default secret for localhost is testing123 unless you changed it – it is strongly recommended to change it!
dddd
$ radtest harry Potter 127.0.0.1 1812 testing123
Sent Access-Request Id 229 from 0.0.0.0:a36a to 127.0.0.1:1812 length 75
        User-Name = "harry"
        User-Password = "Potter"
        NAS-IP-Address = 127.0.1.1
        NAS-Port = 1812
        Message-Authenticator = 0x00
        Cleartext-Password = "Potter"
Received Access-Accept Id 229 from 127.0.0.1:714 to 127.0.0.1:41834 length 44
        Service-Type = Framed-User
        Tunnel-Type:0 = VLAN
        Tunnel-Medium-Type:0 = IEEE-802
        Tunnel-Private-Group-Id:0 = "9.75"
Earlier in this post, we also configured our PC as a NAS client – this is required to use NTRadPing. We can pass the same username and password to NTRadPing and we will see a similar debug out.

Now that we’ve configured FreeRADIUS, we can configure the Cisco Mobility Express in the third part of this blog series.
References and Links
Microsoft – Deploy Password-Based 802.1X Authenticated Wireless Access


Leave a Reply